Showing posts with label cream cheese. Show all posts

Wednesday, 20 November 2013

Pumpkin Chocolate Swirled Mini Cheesecakes with a Spiced Graham Crust

Pumpkin Chocolate Swirled Mini Cheesecakes with a Spiced Graham Crust
Another belated post...my apologizes we've been rather absent on the blog. The days are flying by faster than I can bake everything on my autumn bake-list. Since squash is the flavour of autumn, I wanted to incorporate pumpkin into the Halloween treats shared with Fat Rats. And everyone likes cheesecake right? I beat The Clumsy One at making these, mwahahaha~

Pumpkin Chocolate Swirled Mini Cheesecakes with a Spiced Graham Crust
-Insert ranting here- 

I actually put that in my draft... but there isn't much on my mind today, so you're in luck! Reduced amount of nonsense in this post.

Pumpkin Chocolate Swirled Mini Cheesecakes with a Spiced Graham Crust
The spiced graham crust can be substituted with gingersnap cookies, as that is what I was aiming to copy. The hint of extra spices amps up the volume of the spices already in the cheesecake batter. I admit, the chocolate swirl doesn't do much for the cake, other than make it look prettier. Feel free to leave the extra step out if it is going to be topped with whipped cream (coconut whipped cream, anyone?) or decorated with other methods. Either way, it'll be sure to impress and satisfy~

The gradual cooling of cheesecake is a vital part of the procedure, especially when making larger sizes. I still experienced a little bit of cracking on these mini cheesecakes and felt that they were just a tinge on the over-cooked side. If that is a concern for you, stop the oven about two minutes earlier and begin the process of cooling.

Pumpkin Chocolate Swirled Mini Cheesecakes with a Spiced Graham Crust
Yield: 12 muffin-sized cheesecakes

Ingredients

For the crust
  • 5 graham crackers (the long rectangular shaped ones)
  • A pinch each of ground ginger and nutmeg
  • tsp ground cinnamon
  • 2 tbsp coconut oil, melted
For the filling
  • 8 oz. cream cheese, at room temperature (low fat is okay) 
  • ¼ cup brown sugar
  • ½ cup pumpkin puree
  • 1 tsp cinnamon
  • ⅛ tsp each of ground ginger and nutmeg
  • 1 egg
  • ½ vanilla
  • 2 tsp coconut milk
  • 1 tbsp cocoa powder
Directions
  1. Preheat oven to 350˚F. Line a standard muffin pan with twelve paper liners.
  2. Blitz your graham crackers in a food processor to make crumbs. Add the spices and pulse a few times to combine. Add the melted coconut oil to the crumbs and mix until a wet sand texture is achieved. 
  3. Press 2 to 3 tsp of the crumb mixture firmly into the bottom of each paper liner, I recommend using the back of a small spoon.
  4. Bake crust in the preheated oven for 4 minutes.
  5. In a mixing bowl, cream the cream cheese and brown sugar together until homogenous and fluffy.
  6. Add the pumpkin puree and spices, mix until smooth. 
  7. Add egg, vanilla, and coconut milk and mix again until smooth.
  8. Reserve about 3 tbsp of the cheesecake batter in a separate bowl. Add cocoa powder to the reserved batter. Set aside.
  9. Divide pumpkin cheesecake batter evenly between liners. Place dollops of the chocolate cheesecake batter on top and swirl with a toothpick.
  10. Bake in preheated oven for 20 minutes. When done, prop the oven door open slightly and allow cheesecakes to cool in the oven for about 10 minutes. The cool completely on the counter in the pan before chilling in the fridge. Bringing the cheesecakes gradually to room temperature will prevent cracking. 
  11. Once completely cooled, store in refrigerator. They last for quite a while, around a week or two?
Love from Coconut Crumpet's Corner ♡

Monday, 2 September 2013

Strawberry Swirled Mini Ricotta Cheesecakes

Here comes another birthday post! This time for my very best friend Az, whom was featured with the glorious chicken wings at Phnom Pehn. Strawberries and cheesecake are two of her favourite foods, so that's what I planned as her birthday cake. But with a twist!

Strawberry Swirled Mini Ricotta Cheesecakes

Unlike my Berry Swirl Cheesecake or Mocha Cheesecake Squares, there are two types of cheeses in this cake, cream cheese and ricotta. The addition of ricotta creates a texture that is much lighter and fluffier. On the cheesiness scale, I'd place these mini cheesecakes between a New York cheesecake and a Japanese cheesecake, but closer to the Japanese one. It's not as spongy as it's Japanese relative, just a bit cheesier.  Perhaps my cheesecakes like puns... (Okay, that was a really bad joke. Just for you, Peanut Crumpet =___=;;)


Fresh Summer Strawberries
The simple strawberry sauce can easily be substituted by almost any other flavours. Other fruits such as blackberries would work beautifully (check out my blackberry + ricotta recipe) or richer flavours like peanut butter or chocolate could be used too! To do so, reserve a bit of cheesecake batter to mix in a generous scoopful of peanut butter, cocoa powder, or whatever flavour your heart desires. To create the heart-shaped swirls, simply dot a few blobs of sauce over the raw batter and drag a toothpick through the centre depending on which direction you wish the hearts to go. A simple yet impressive design!

More fresh strawberries!
To amp up the aroma of these individual cheesecakes, I toasted some almonds to whiz in with the crust. Hiding it in the crust is a discrete way to add another element to the dessert; my mom suddenly asked me "what did you put in the crust?" She definitely knew it wasn't the basic graham cracker crust, but couldn't quite put her finger on what was different.

Strawberry Swirled Mini Ricotta Cheesecakes
These muffin-sized miniature cheesecakes make it clean to pack to work or school for a snack or to share at a party. The paper liner doesn't stick at all once the cake has thoroughly been cooled. Clean and easy to eat, -thumbs up-

Ready to dig into my serving of Strawberry Ricotta Cheesecake
Serving these mini cheesecakes with a generous dollop of the swirling sauce is an easy way to not only use up the leftover sauce, but to strengthen the strawberry flavour. Because, realistically, seven drips of strawberry sauce doesn't stand out much when the cheese flavour is so prominent.

Click below for the recipe!

Saturday, 31 August 2013

Healthy Very Vanilla Cupcakes

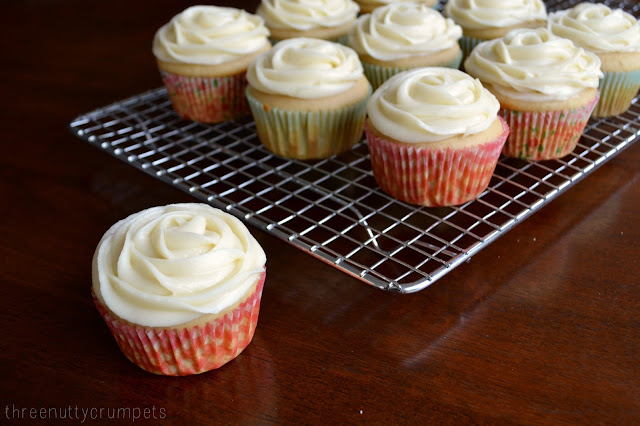
It's time to celebrate another birthday! Be prepared for a few more birthday posts coming soon, as there are quite a few August birthdays (including our very own Papaya Crumpet!). My dearest friend Rose wanted something 'vanilla' so I made her vanilla cupcakes topped with vanilla cream cheese frosting. All white (technically, off-white) and classy.

Healthy Very Vanilla Cupcakes
Somewhere on this blog, I have previously mentioned my back luck with cupcakes. Traditional butter-laden versions and healthy versions alike have problems when I attempt to bake cupcakes. Usually the top is covered in holes or the texture is heavy and dense. But this vanilla cupcake recipe seemed to end my streak of bad luck! We can celebrate this too, haha!

Piping Cream Cheese Frosting Roses on Healthy Very Vanilla Cupcakes
This recipe was so quick to put together and yielded round cupcakes that rose above their liners. Only one mixing bowl needed! No problems were encountered when I switched these to make regular sized cupcakes instead of mini ones. I was so excited to see they looked like normal cupcakes when pulled out of the oven. No need for extra fiddling with the oven temperature and watching them like hawks. One toothpick check and they were finished~

Healthy Very Vanilla Cupcakes

This is a considerably healthy cupcake because of the low amount of sugar and oil. For one loaf or a dozen cupcakes, I always stay under half a cup of sugar. Since these vanilla cupcakes were for friends, I used half a cup. However Eat Good 4 Life noted that a third cup is sufficient if adding icing. She even used whole wheat flour, which would up the amount of fibre but in sacrifice for a darker colour. Either way, I approve of this recipe and would try it again! It is a cupcake I could eat without knowing it will completely sabotage my diet.
 
The texture wasn't the lightest and fluffiest cupcake I've had (check out Papaya Crumpet's earl grey cupcakes if you're looking for a fluffy cupcake), but they were acceptable. Maybe this is due to the fact I only had half a cup of pastry flour to use so some all purpose flour was mixed in. Vanilla paste or extra vanilla bean would make these even better. That's how these cupcakes can become 'very vanilla'.


Healthy Very Vanilla Cupcakes with Rose-shaped Icing

I kept with a 'rose' theme with the gifts I was giving her, and icing these cupcakes using my Wilton 2D Closed Star tip was a no brainer. Plus, it gives the cupcakes that 'professional cupcakery' look. I used a traditional cream cheese frosting, which was the only unhealthy part. No recipe is included below because I kind of just made it from scratch. Mixing the cream cheese and butter by hand (because poor Coconut Crumpet doesn't even own a hand mixer...much less a beautiful pink Kitchen Aid...) and adding icing sugar until the consistency I wanted was achieved. To be honest, I think I must've added too much because it was a bit too sweet. Thank goodness the cupcakes themselves weren't already filled with sugar!

Healthy Very Vanilla Cupcakes
Yield: 11 large cupcakes
Adapted from Eat Good 4 Life

Ingredients


  • 1 egg
  • ¼ cup coconut oil, melted
  • 1 cup milk
  • 1 tbsp vanilla
  • 1 ½ cups all purpose flour
  • ½ cup pastry flour
  • 1 ½ tsp baking powder
  • ½ tsp baking soda
  • A few grinds of Himalayan pink sea salt


Directions
  1. Preheat oven to 350˚F. Line a muffin pan with paper liners.
  2. In a large bowl, whisk together egg, oil, milk, vanilla, and sugar until well combined.
  3. Sift in flours, baking powder, and baking soda. Add a few grinds of Himalayan pink sea salt.
  4. Fold batter until just combined. Over mixing yields large holes in the cupcake!
  5. Scoop batter into prepared pan using a cupcake scoop or ice cream scoop.
  6. Bake for 15 minutes or until a toothpick inserted comes out clean or with just a few crumbs.
  7. Cool completely before frosting.
Love from Coconut Crumpet's Corner ♡

Sunday, 19 May 2013

3rd Tier: Mocha Cheesecake Squares, Coconut Muffin, and Green Tea Cream Puff


DIY Mother's Day High Tea at Coconut Crumpet's Home
As a dessertatarian, this is obviously the most exciting tier. The fact that I prepared an excess amount of each recipe didn't really bother me. That meant I would have dessert to last me a week, mwahahaha! There were a few bumps along the way during my baking of these desserts. A malfunctioning convection oven, running out of all purpose flour, burning this, burning that... Nevertheless, the guests didn't notice so let's just keep it between us, ok?

Saturday, 18 May 2013

DIY High Tea for Mother's Day

DIY Mother's Day High Tea by Coconut Crumpet
To celebrate Mother's Day, as well as my mama's birthday, I prepared a high tea lunch for her and a group of close friends to enjoy. It took three or four days to prepare as one would never have enough time to cook, bake, and assemble everything in one day. With some helping hands and baking elves, this ambitious project of mine was successfully presented. Even if it was with [not purposely] mismatched dishes and a plastic tablecloth...

Sharing high tea with a group of friends is truly an experience every foodie should have, whether it be at a restaurant or hosting one yourself. It's a rare chance to dress up and act like a bunch of rich old grannies sitting at a beautifully adorned table having quality gossip time. That is the Crumpets' dream life as retirees.   

My love for high tea has grown significantly after this party. I just picked up 3 sets of tiered trays from Costco in preparation for any other opportunities for me to host another high tea. They only have 2 tiers, but hey, it was $6!

Below is the menu for that day's high tea. Recipes for select goods will be accessible through the links. The ones with no links are because there isn't really a recipe, the words you read are all the ingredients used. There just ain't much to it.
 
Open-faced Cucumber Cream Cheese Sandwich
Smoked Salmon Cream Cheese Sandwich
Shrimp and Avocado Crostini
Chocolate Dipped Strawberries with Toasted Almonds

Monday, 11 March 2013

Berry Swirl Cheesecake


Berry Swirl Cheesecake
So, you bought 24 oz. of cream cheese, used two bricks in Peanut Crumpet's birthday cake and are now left with one brick. What to do with that one brick? Make more cheesecake!

This recipe is simple and versatile; swirl in just about anything! I used blueberries this time, but you can set aside a bit of batter and add some pumpkin or peanut butter or chocolate etc. Experiment with the flavours and let us know your suggestions!

1 brick of cream cheese was enough to make a small flat of cheesecake. Enough for 6 people to have a hearty piece. Doubling or tripling the recipe will work fine, special instructions are given in the recipe.


Berry Swirl Cheesecake 
Yield: 1 loaf sized cake

Ingredients:
  • 1 cup berries
  • 2 tbsp sugar or honey
  • ½ tbsp. orange juice or water (omit if using frozen berries)
  • Orange zest 
  • ¾ cup graham cracker crumbs
  • 1 ½ tbsp. butter or oil (I used coconut oil)
  • 8 oz. cream cheese, at room temperature
  • ¼ cup granulated sugar
  • 1 egg
  • 1 tbsp lemon juice
  • 1 tsp vanilla
 Directions:
  1. To make the berry sauce,  cook berries, sugar, orange juice and zest in a small saucepan over medium-high heat until it comes to a boil. 
  2. Lower the heat and continue to cook until reduced.
  3. Once cooled, puree in a food processor until smooth. Set aside.
  4. Preheat oven to 350˚F. Grease a loaf pan, especially well in the corners.
  5. Blitz your graham crackers in a food processor to make crumbs. Add the melted butter or oil to the crumbs and mix until a wet sand texture is achieved. 
  6. Press crumb mixture firmly into the bottom of the pan, I recommend using a spatula.
  7. Bake crust in the oven for 4 minutes.
  8. Beat the cream cheese and sugar together until light and fluffy.
  9. Add egg and beat well. Then add lemon juice and vanilla and beat well.
  10. Pour cheesecake batter over the crust and smooth the top.
  11. Put dollops of the berry sauce over the top of the batter and gently swirl with a knife to create a marble pattern. Be careful not to hit the crust! (If you are doubling the recipe, alternate between batter and swirling to evenly distribute the filling in a thicker cake.)
  12. To prevent cracking, put loaf pan in a larger pan with about 1 inch of boiling water.
  13. Bake the entire cake for 35 minutes or until the edges are golden and the center is puffed. For larger cakes, lower the heat to 325˚F after 30 minutes and bake for another 30 minutes.
  14. After the baking time, turn off the oven and leave the cake inside for 15 minutes. Do not open the oven door!
  15. After 15 minutes, cool on the counter until room temperature. Then refrigerate for a few hours before serving. You may choose to serve with extra berry sauce.
Love from Coconut Crumpet's Corner ♡